
Welcome to the Gravity Connect API documentation for Device Partners (typically Device OEMs). This developer guide outlines the API endpoints and integration capabilities that Device Partners need to implement to connect their distributed energy resource (DER) devices with a virtual power plant (VPP) platform or a DERMS solution. The Device Partner endpoints work in combination with the VPP's Gravity Connect endpoints to support device enrollment and real-time control.
After building the endpoints described in this guide, Device Partners can add their products to the VPP's customers' programs. Utilities will use the VPP's platform and suite of device integrations to access real-time data and control smart devices as part of VPPs, demand response programs, and/or DER management programs.
This documentation is open-source, and we encourage all DERMS and VPP platforms to use this standard. Integrations built to the Gravity Connect API standard are not limited to use with one VPP platform.
Gravity Connect is an open API specification developed by Virtual Peaker to simplify and accelerate the integration of distributed energy resource (DER) devices into utility demand response (DR) and DER management programs.
Gravity Connect offers several key benefits to Device Partners:
- Streamlined device integration: Gravity Connect provides standardized endpoints and data models to enable quick, easy integration of your devices with VPP platforms.
- Accelerated time-to-value: With simplified integrations via Gravity Connect, you can get your devices connected to DR programs faster, allowing utilities to control and access data from your devices sooner. This means faster time-to-value.
- Open and interoperable: Gravity Connect uses modern API best practices and is openly published to facilitate integration. It is designed to be vendor-agnostic so your devices can integrate with any VPP or DERMS platform that implements the specification.
- Large ecosystem access: VPP platforms that use Gravity Connect have relationships with dozens of utilities that run DR programs. Integrating via Gravity Connect gives your devices access to this large ecosystem of potential customers and programs.
- Standardized device control: As VPPs launch advanced control software to improve utility event operations, Gravity Connect will continue to standardize control commands so that each improvement does not require modifications to each integration.
Gravity Connect simplifies and streamlines the process of integrating DER devices into utility programs by handling the complexity behind a standardized and interoperable API. By partnering with VPPs using a Gravity Connect integration, your devices can access a large ecosystem of utility customers and programs quickly and easily.
If you're an OEM, utility, DERMS provider, or technology provider interested in learning more about integrating with Gravity Connect, our team is here to help.
To get started and discuss your use case, please reach out to our Gravity Connect support team at gravity-connect@virtual-peaker.com.
This list tracks noteworthy changes to the API specification.
- 2.0.6 - Revised the explanatory sections of the documentation.
- 2.0.5 - Added Device Partner Driven Enrollment.
- 2.0.4 - Updated power and energy signals in the TSTAT device-specific definition.
- 2.0.3 - Updated the command and signals in the TSTAT device-specific definition.
- 2.0.2 - Add
unsubscribefrom Device publishing as VP method of unenrollment. And, updated diagrams and and minor typo fixes. - 2.0.1 - Major updates to documentation including the
Energy Intervalendpoint. - 1.5.2 - Fixed using incorrect
baseUrlto correctvpBaseUrlin VP Endpoints of Postman Collection. - 1.5.0 - Adding specification for EVSE device type with signals, settings, and commands.
- 1.4.1 - Adding storage HVAC device type and FAQs. Clarifying startTime may be in past. Making deviceUids array optional when creating group.
- 1.4.0 - Clarifying CTA modes (including swapping NORMAL in for RUN_NORMAL) and cta-op-modes.
- 1.3.3 - Requiring country when houses are published to device partner. Specifying country field follows ISO 3166-1 alpha-2 (contrary to previous documentation which reference
USAas a value). - 1.3.2 - Adding an optional array of devices when publishing houses.
- 1.3.0 - Adding endpoint for individual devices to opt out of a group command.
- 1.2.0 - Adding Publish houses for installation endpoint under a new pairing code based onboarding flow. Also clarifying pairing code structure and international addresses.
- 1.1.0 - Adding Pairing Code Device Discovery as a proposal. Also clarifying that 1 program = 1 utility.
- 1.0.1 -
invalidDeviceswas listed under the request body forUpdate group details, but it was meant to be under the response. Fixed this.
The remainder of this guide describes the Device Partner endpoints, which are half of the integration. Meanwhile, the VPP API guide outlines the API endpoints hosted by the VPP for receiving data from the Device Partner's devices. The endpoints support standard integration operations, including publishing device signals, command statuses, and device enrollment events. In combination with the Device Partner endpoints, they allow a two-way flow of information that enables utilities to control and manage devices.
This data enables essential capabilities like:
- Real-time device monitoring and analytics
- Aggregation of fleet data across a utility
- Execution of demand response events and commands
- Accurate measurement and verification of event performance
Having a standardized set of endpoints for data intake simplifies integration significantly compared to custom development. Device Partners simply publish data in the documented format to stream it to the VPP's platform.
Learn more about the data flows in the Integration Overview.
- Device Partner: The party working to integrate with the VPP. This may be an OEM or a company creating digital solutions for devices.
- Program: An arrangement where a utility controls homeowners' devices in exchange for incentives such as rebates or gift cards. Multiple Device Partners typically participate in each program.
- PROGRAM_PUBLISH_KEY: The identifier for a program, unique to each combination of program and Device Partner.
- PROGRAM_PUBLISH_SECRET: The secret used as an input to HMAC for publishing program data to the VPP.
- DEVICE_PUBLISH_SECRET: The secret used as an input to HMAC for publishing device data to the VPP.
- Signals and Settings: The device telemetry and configuration data that is streamed to the VPP. See the Device Type Specifications for a specific list of the signals and settings required for each device type.
- VP_COMMAND_OBJECT: A portion of the payload sent to the Device Partner when the VPP sends a command. For more information about the commands required for each device type, see the Device Type Specifications. For details about the command request, see the Send Command Endpoint.
- OAuth 2.0: An open authorization framework that enables applications to obtain limited access to user accounts on an HTTP service, such as for device onboarding. It works by delegating user authentication to the service that hosts the user account, and authorizing third-party applications to access the user account. Gravity Connect uses OAuth 2.0 for device enrollment and for all requests from the VPP to the Device Partner, such as commands.
- Webhook: A method for apps to provide other applications with real-time information. When an event occurs, a HTPP POST callback is sent to the specified webhook URL endpoint. Gravity Connect uses webhooks for Device Partners to publish data updates instead of the VPP polling for data.
A new Device Partner typically integrates with a VPP's Gravity Connect API following this process:
- Kickoff Meeting: the VPP and the Device Partner discuss which device types and programs this integration will be used for initially, which affects which enrollment flows and data models will be implemented.
- Onboarding: the VPP provides the Device Partner with access to a development environment.
- Implementation: The Device Partner implements the required Gravity Connect endpoints based on the documentation and earlier discussions about the scope of the integration.
- QA: After the Device Partner has tested the integration, the VPP performs a final round of testing to validate the functionality and data flows.
- Beta Launch: The integration goes live for the first customer, and the Device Partner can begin enrolling devices into the utility program. These devices begin streaming data shortly after enrollment and are ready to participate in events. The VPP and the Device Partner monitor the first enrollments to ensure success.
- Go Live: After the integration has operated smoothly for a period of time, it becomes available to other customers and utility programs.
To use Postman to interact with endpoints, download the Postman Collection. After file opens hit Mac(command + s) or Windows(control + s) to save the file and download it to your computer.
Postman Setup
- Download the file linked here.
- Open Postman and select
Importnear the top right of the left side panel menu. - Select
Upload Filesand select the Postman Collection you downloaded earlier. - Upon successful import it will create a collection Called
Gravity Connect APIwith two main folders inside calledVP EndpointsandDevice Partner Endpoints.
Device Partner Endpoints
The collection uses Postman’s built in authentication handling to authenticate the request. Below are the steps to configure and request a new token, which will then be automatically included in subsequent requests.
- Select the
VP Endpointsfolder. - Set the following:
- Set
TypetoOAuth2.0andAdd auth dat totoRequest Headers. - Enter
Token Nameto what you want it to be called. - Set
Grant TypetoClient Credentials. - Use the
Client IDandClient Secretyou created within your application. - Set the
Access Token URLto the auth endpoint for your application. - Set
Client AuthenticationtoSend as Basic header. - Leave any remaining fields to their default setting.
- Set
- Click
Get New Access Tokenbutton. - If all was successful it should pop up a confirmation the token was successfully created. Click use token and you are ready to begin accessing the endpoints.
Device Partner Endpoints (OAuth Onboarding)
We haven’t used the Postman collection for these endpoints yet, but we expect that using the Authorization Code flow will work something like:
- Select the
OAuth Onboardingfolder. - Set the following:
- Set
TypetoOAuth2.0andAdd auth dat totoRequest Headers. - Enter
Token Nameto what you want it to be called. - Set
Grant TypetoAuthorization Code. - Use the
Client IDandClient Secretyou created within your application. - Set the scope to the scope that your application expects for our use case.
- Set the
Access Token URLandAuth URLto your urls. - Set the
Callback URLto the VPP’s URL. - Set
Client AuthenticationtoSend as Basic header. - Leave any remaining fields to their default setting.
- Set
- Click
Get New Access Tokenbutton. - If all was successful it should pop up a confirmation the token was successfully created. Click use token and you are ready to begin accessing the endpoints.
Authentication for VPP Endpoints
Attached to the VPP endpoints is a script that will automatically create an HMAC and set it as a variable that is then used to make the request. These scripts expect that you’ve properly set the PROGRAM_PUBLISH_KEY, PROGRAM_PUBLISH_SECRET, DEVICE_PUBLISH_SECRET.
To do this:
- Click on the root folder for the Gravity Connect API. Then select the tab
Variables - Find the variable and update the
CURRENT_VALUE
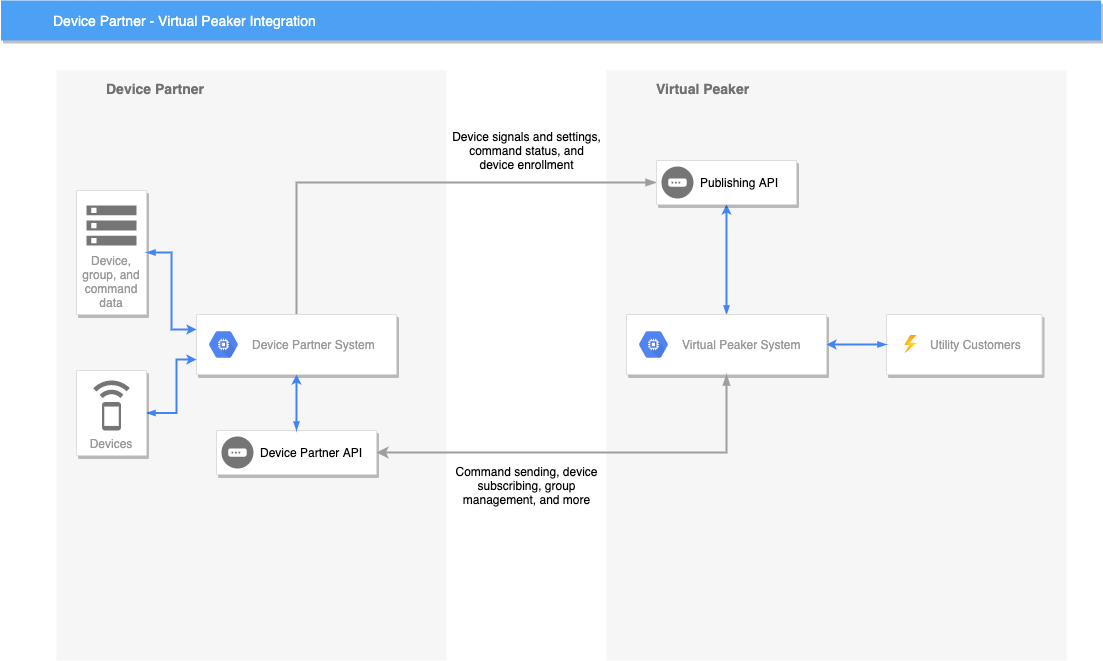
Gravity Connect uses the following authentication models:
Requests from the VPP to the Device Partner's endpoints
- These requests use OAuth 2.0 authentication. Please note that these OAuth credentials are required even if the homeowner enrollment flow is not OAuth-based. If the homeowner enrollment flow is OAuth-based, it can use separate credentials or it can re-use these.
- The Device Partner provides:
clientId: A program-specific ID.clientSecret: A program-specific secret.
Requests from the Device Partner to the VPP's endpoints
- These requests authenticate using a combination of the following credentials and HMAC authentication. The VPP provides:
PROGRAM_PUBLISH_KEY: The unique identifier for a utility program, provided when a program is set up.PROGRAM_PUBLISH_SECRET: The secret key used to generate HMAC signatures when publishing program-level data, provided when a program is set up.DEVICE_PUBLISH_SECRET: The secret key used to generate HMAC signatures when publishing device-level data, provided when each device is enrolled.
- Find more detail about authenticating with the VPP's endpoints in the VPP API Guide.
Each device will be added to a program using one of the following flows. After a device is added, the VPP will call the /subscription endpoint on the Device Partner's API to enable device data publishing and share the DEVICE_PUBLISH_SECRET.
The flows most suitable for device owners to enroll devices are:
- OAuth Device Discovery
- Pairing Code Device Discovery
The flows most suitable for installers or program managers to enroll devices are:
- Device Partner Driven Enrollment
- Pairing Code Device Discovery
Pairing codes are used in some enrollment flows to link device enrollments to homeowner enrollments to ensure accurate device association. The format is:
- 2 alphanumeric characters denoting the pairing code prefix representing the program (e.g.,
A1) - 5 random numeric characters (e.g.,
12345) - 1 check digit (Luhn algorithm, calculated from the 5 random numeric characters, e.g.,
5)
Example: A1123455
How to Validate a Pairing Code
- Extract the first 2 alphanumeric characters to validate them against program pairing code prefix.
- Extract the 5 random numeric characters (characters 3–7).
- Calculate the Luhn check digit using the standard algorithm.
- Compare the calculated digit to the last digit (character 8).
The device partner can validate the pairing code to provide immediate feedback. The VPP's API can perform the same validation upon receipt of a pairing code.
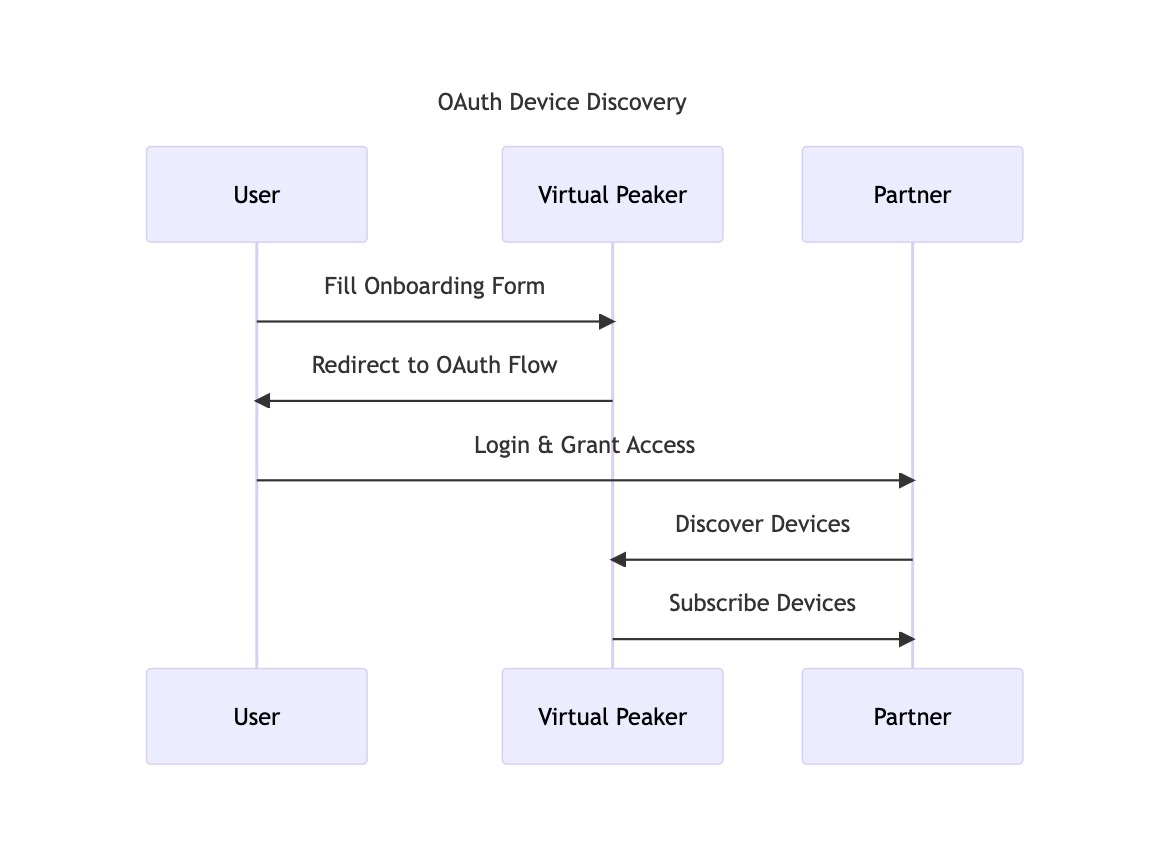
In this flow, a device owner fills out an enrollment form hosted by the VPP, then logs in to their Device Partner account to grant the VPP permission to access and control their devices.
The OAuth device discovery flow works as follows:
- The device owner fills out an onboarding form on the VPP's site.
- At the end of the form, the device owner is redirected to the Device Partner's OAuth authorization page via a link.
- The user logs into the Device Partner's app and grants OAuth access permissions.
- The Device Partner app completes the OAuth authorization code flow, exchanging the code for an access token.
- Using the access token, the Device Partner calls their API to retrieve the user's devices.
- The Device Partner associates the devices with the correct VPP program in their backend and completes any other required internal onboarding logic.
- The Device Partner completes the OAuth callback to the VPP.
- The VPP discovers devices using the OAuth token provided.
- The VPP subscribes to devices for data publishing and provides a DEVICE_PUBLISH_SECRET.
The VPP creates a unique client_id for each utility program. This ID is passed in the OAuth link to associate devices with the correct program.
When a customer onboards via the OAuth flow, we will direct them to a URL in the format below with:
- Your domain substituted for example.com
- Our domain substituted for gravity.example.com
- The
client_idof the program the user is onboarding to - A state generated by us to track the flow
- The scopes required within your system
- access_type=offline as per to indicate that a refresh token should be provided (reference)
https://example.com/oauth2/authorize?access_type=offline&response_type=code&redirect_uri=https%3A%2F%2Fgravity.example.com%2Foauth2%2Fcallback&client_id={}&state={}&scope={}
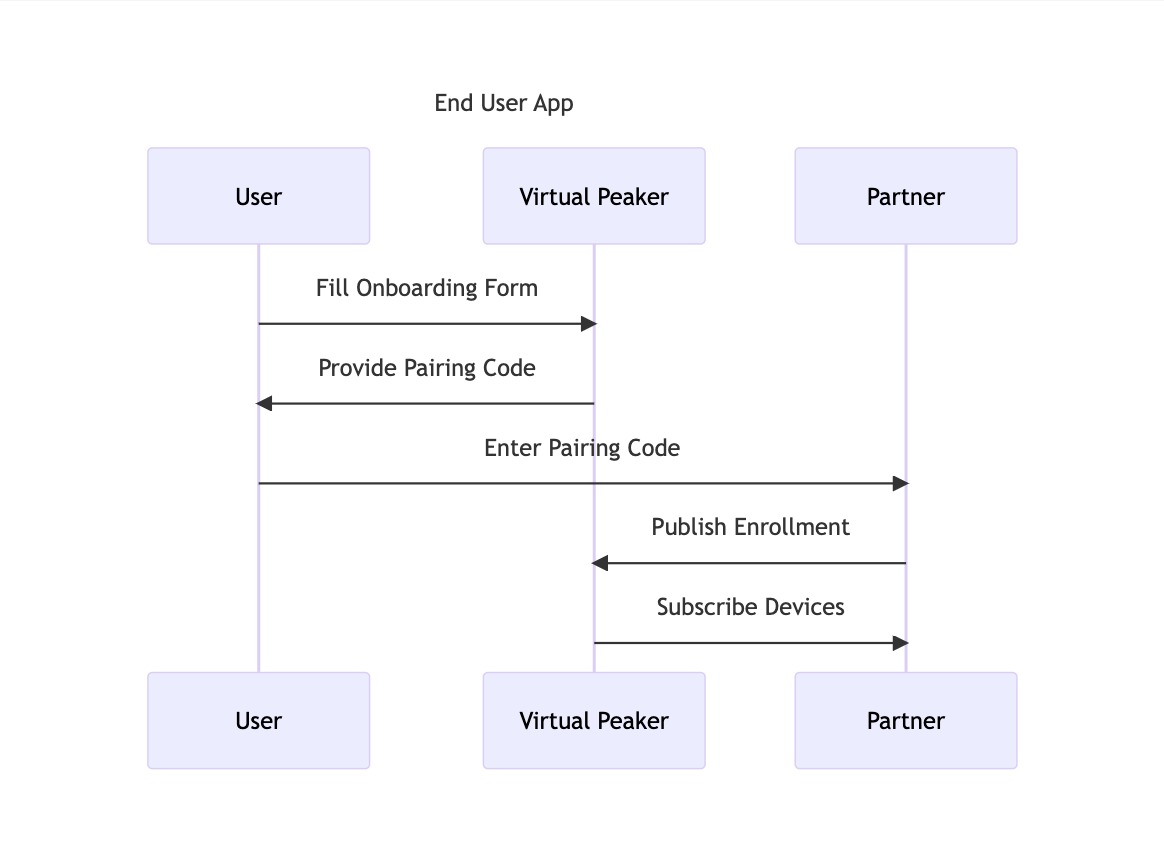
In this flow, a device owner fills out an enrollment form hosted by the VPP, which then presents them with a pairing code. The device owner then informs the Device Partner of their pairing code, which the Device Partner sends to the VPP with information about the device owner's devices. The VPP uses the pairing code to match the devices to the correct enrollment form data.
The pairing code device discovery flow works as follows:
- The device owner fills out an onboarding form on the VPP's site.
- The form provides them with a pairing code and instructions to enter it in the Device Partner's app.
- The device owner enters the pairing code in the Device Partner's app, and the Device Partner publishes a device enrollment event to the VPP's API.
- The publish event includes the pairing code, allowing the VPP to match the devices to the correct enrollment form data.
- If multiple devices are enrolled for this device owner, the Device Partner sends multiple publish payloads with the same pairing code.
- The VPP subscribes to each device for data publishing and provides a
DEVICE_PUBLISH_SECRET.
Each utility program is assigned a different pairing code prefix that Device Partners can use to identify or confirm which program a device owner is joining.
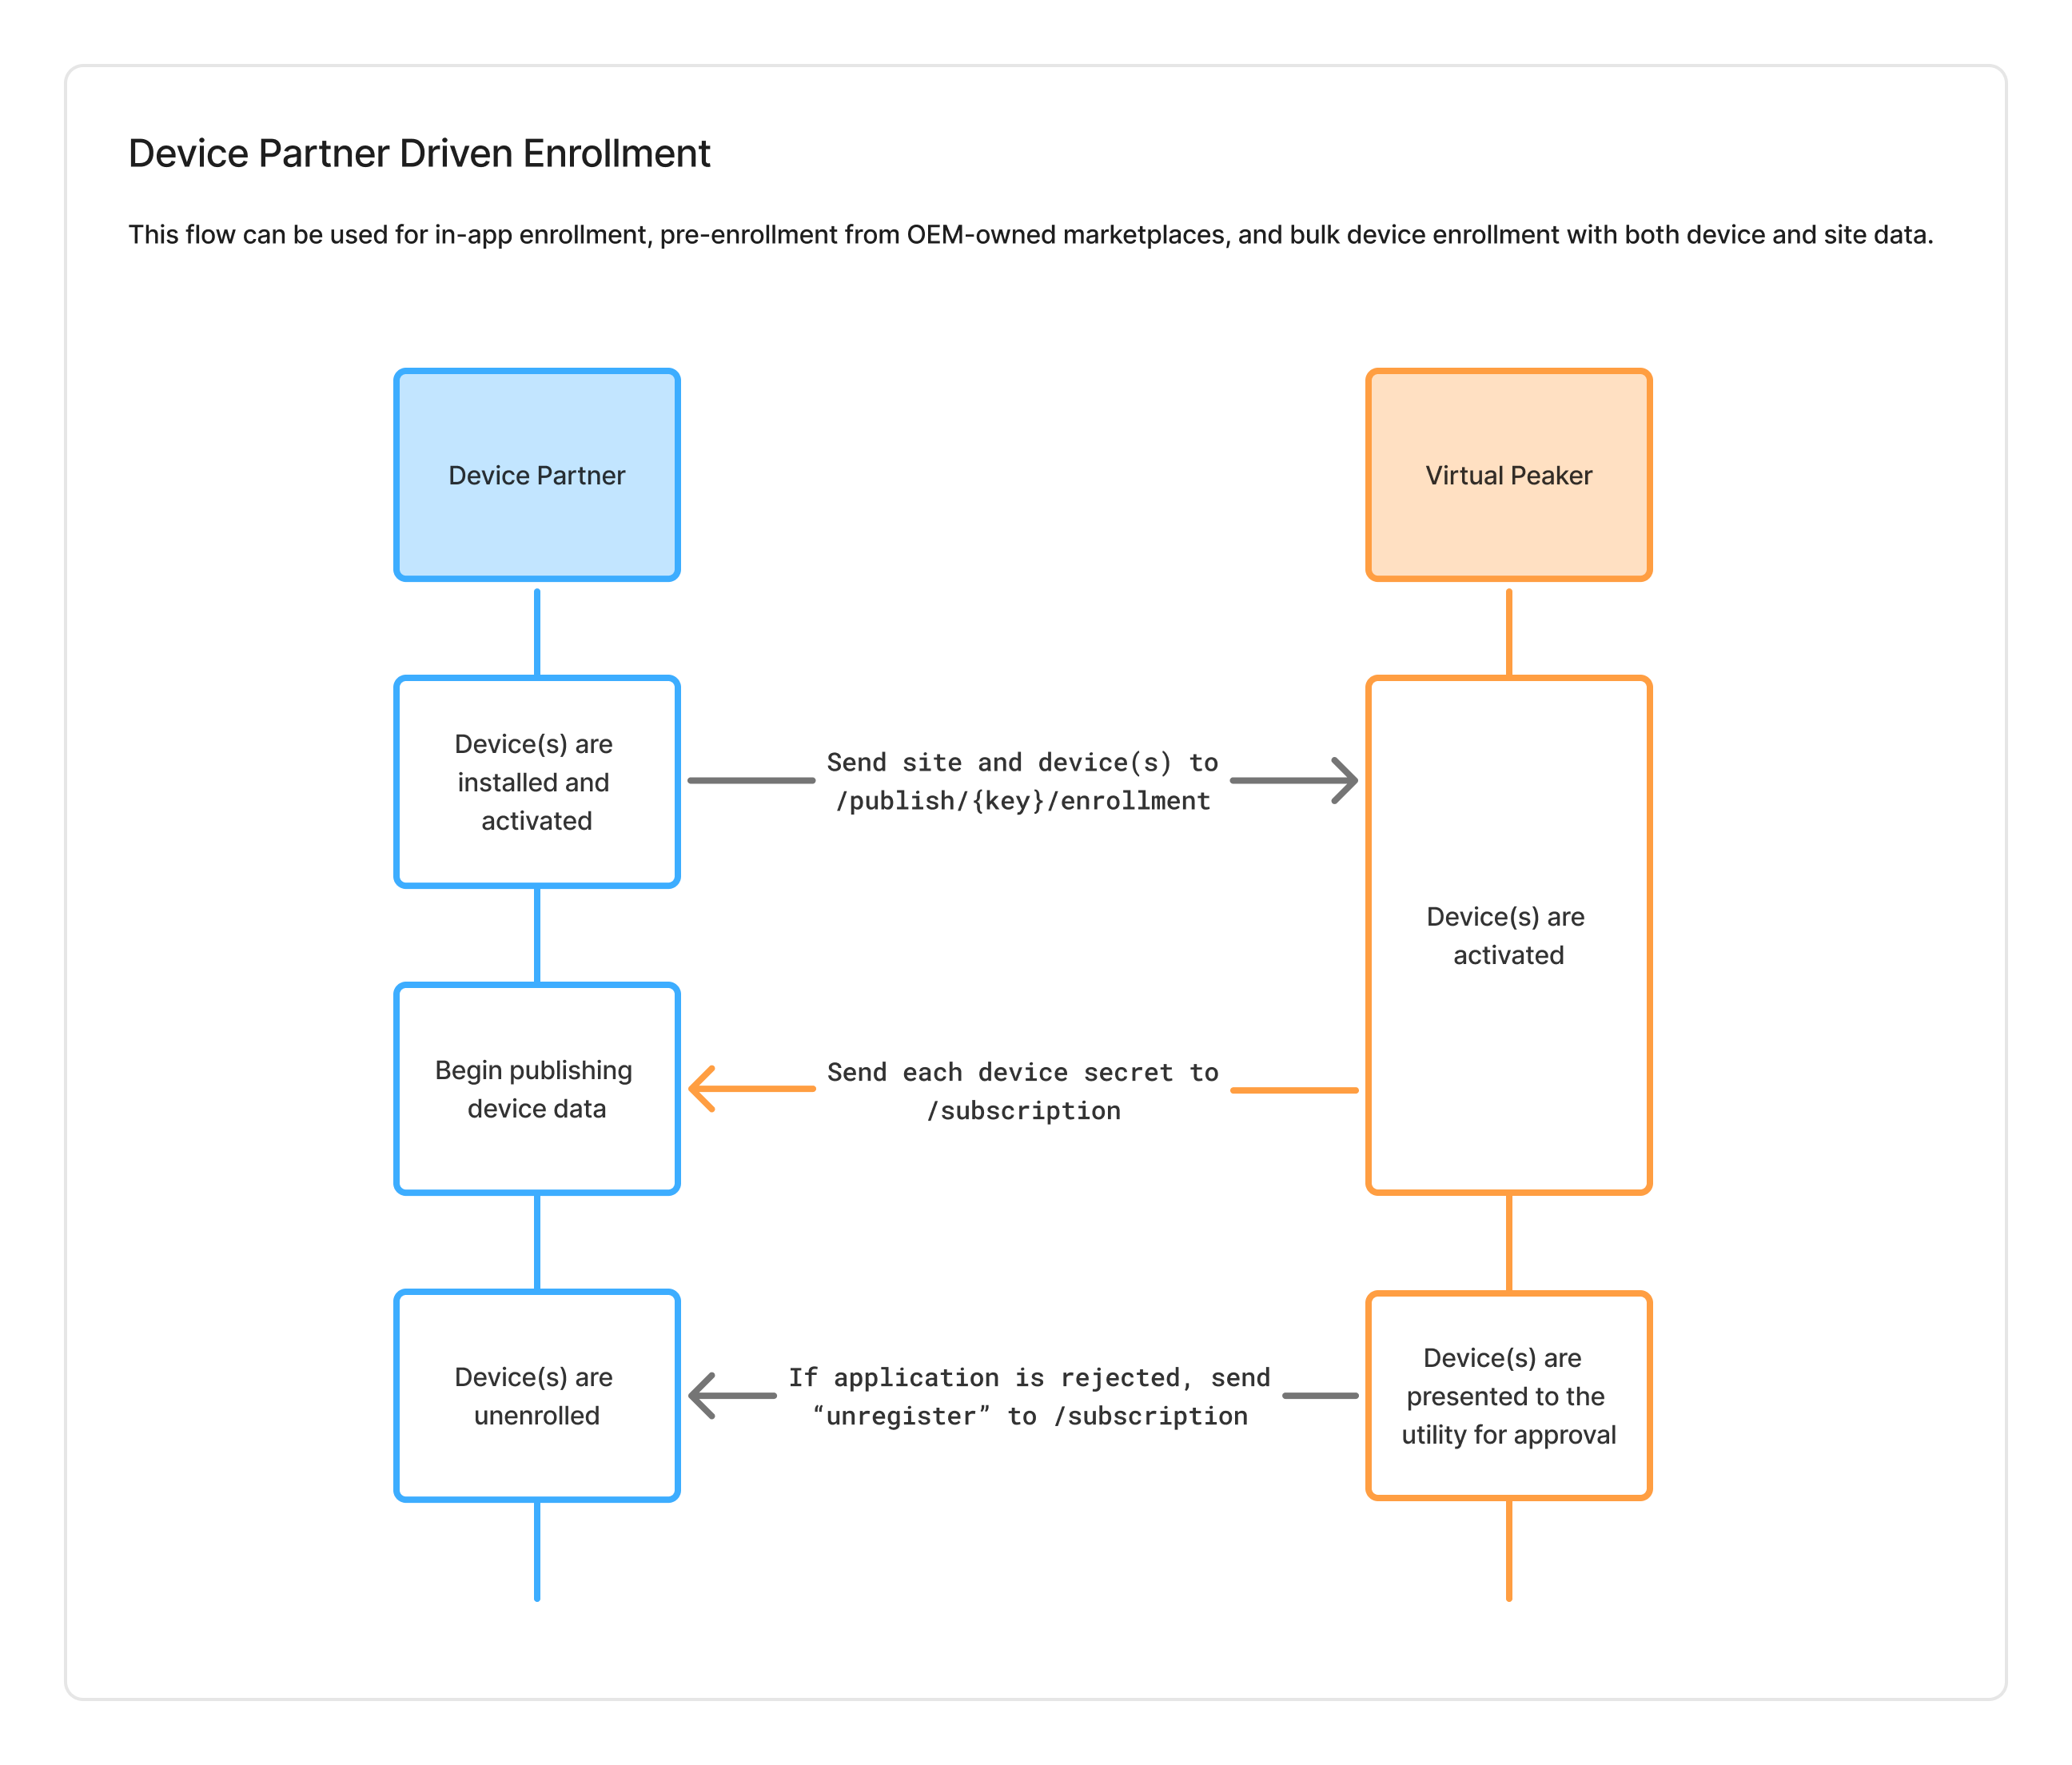
Device Partner Driven Enrollment is a flow that can be used when the Device Partner has enough information about both the devices and the site to form a complete record in the VPP platform. This includes data such as the device UID, the service address, and the device owner's contact information.
The Device Partner can use this flow to proactively enroll devices through the Device Partner's app/website, pre-enroll a device purchased directly from the Device Partner, and bulk enroll devices that are transferred to the VPP.
- The Device Partner publishes an enrollment message containing information about the site and each of the eligible devices. This enrollment message uses the program-specific credentials for the appropriate program.
- The VPP subscribes to the devices for data publishing and provides a
DEVICE_PUBLISH_SECRETfor each. - If the enrollment application is approved, there will be no change. If the enrollment application is rejected by the utility, the VPP will unsubscribe from data publishing.
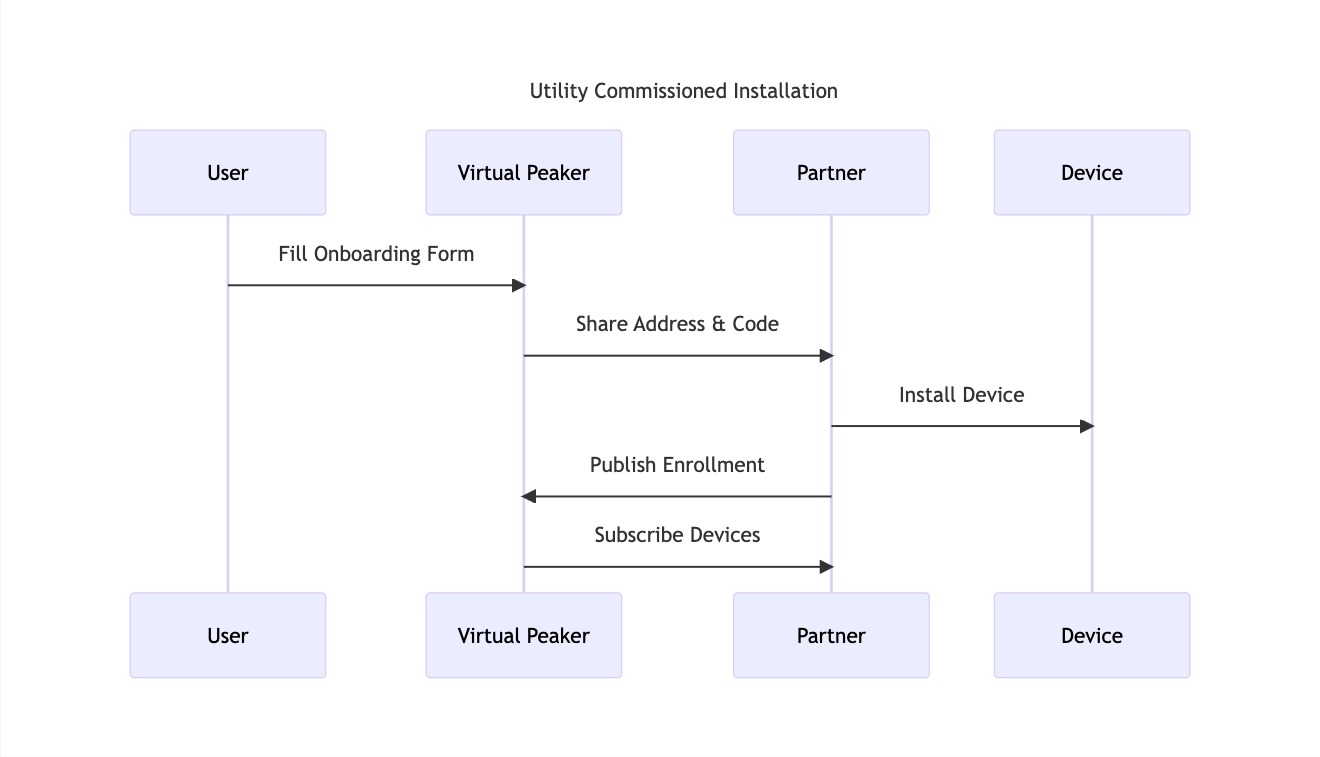
This flow has been deprecated. The Device Partner Driven Enrollment flow is recommended for programs where the device owner is not involved in the enrollment process, such as direct install programs.
The utility commissioned pairing code flow works as follows:
- The device owner fills out an onboarding form on the VPP's site.
- The utility reviews the submission and approves it if eligible.
- The VPP informs the Device Partner of the service address and provides a pairing code.
- The Device Partner installs and activates the device.
- When the installation is complete, the Device Partner publishes a device enrollment event to the VPP.
- The publish event includes the pairing code, allowing the VPP to match the devices to the correct enrollment form data.
- If multiple devices are enrolled for this device owner, the Device Partner sends multiple publish payloads with the same pairing code.
- The VPP subscribes to each device for data publishing and provides a
DEVICE_PUBLISH_SECRET.
After a device has been enrolled, the Device Partner will begin publishing data to the VPP's endpoints. The VPP API guide describes the endpoints that accept device telemetry and configuration updates (referred to as signals and settings), command status updates, and device enrollment updates. These endpoints are authenticated using the DEVICE_PUBLISH_SECRET or PROGRAM_PUBLISH_SECRET (depending on the endpoint) to create an HMAC.
The required data fields vary based on the device type, such as:
- Hot Water Heaters: tank temperature, operating mode, power draw, etc.
- Thermostats: temperature setpoints, operating mode, ambient temperature, etc.
- Batteries: capacity, power flow, status, etc.
Each device type has a set of mandatory data fields that must be implemented, plus optional data fields that can be provided to improve reporting. See Device Type Specifications for the specifications for each device type.
Before finalizing an integration, the VPP will work with each Device Partner to verify that all required data points for a given device type are implemented correctly according to the specifications.
Having accurate and complete data publishing as per the documentation is critical for properly managing each device type within utility programs and optimizing distributed energy initiatives. The required fields for each device type integration must be confirmed before final approval.
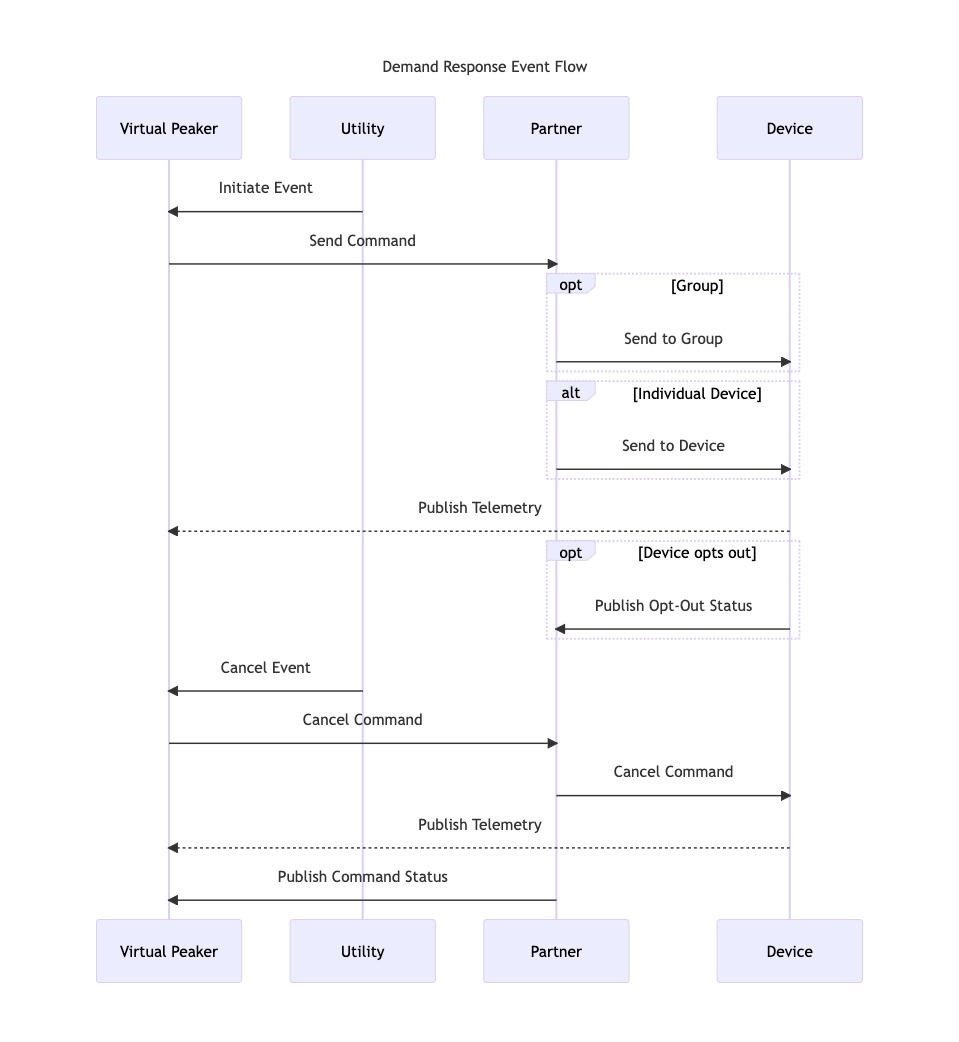
When a utility sends a command using the VPP's platform, the VPP sends a command to the Device Partner targeting a specific device or a group (if group management is supported). See Device Type Specifications for the commands for each device type.
As not all device models support all commands, while building the integration, the Device Partner must inform the VPP of which models support which commands. The types of commands accepted must be consistent per device type + kind. For example, if the Acme Corporation is a device partner who sets up a hot water heater (kind = HWH) with a model name of ACME1000 (type = ACME1000), all ACME devices of kind HWH and type ACME1000 must support the same set of commands, but this set can be different than the command set supported by model ACME1001.
Throughout the duration of a command, devices continue to send data to the VPP. Commands also publish their status. For group commands, an individual device may need to report that it opted out (separate from the status of the command status), which it reports via the device command status endpoint.
The VPP can cancel any command that has been sent to a Device Partner using the cancel endpoint. The VPP may cancel active commands at any point during their duration. The Device Partner should immediately return devices to normal operating modes when a cancellation command is received.
Commands are sent from the VPP to the Device Partner at most 60 seconds before the start time, regardless of the VPP interface supporting program managers scheduling events hours or days in advance. The Device Partner must be able to accept both individual and group commands simultaneously for a given device.
The active operating mode of a device must align with the requested command mode if the device is participating in an event. For example, a water heater cannot report it is in 'NORMAL' mode if it is actively participating in a demand response event that calls for a ‘SHED’ (but it can if it has opted out of the event). The current mode should be updated accordingly as commands begin and end. Throughout each event, enrolled devices continue publishing telemetry data to the VPP's platform through the standard publishing endpoints.
Individual devices report opt-outs via the VPP endpoint publish device command status endpoint. For group commands, individual devices report opt-out status, as needed, via the Device Partner endpoint command opt-out.
Properly syncing modes and command statuses is crucial for accurate measurement and verification of demand response performance. The Device Partner integration must maintain consistency between the active command, device mode, and device command status.
For demand response events targeting individual devices, opt-out status should be reported using the VPP endpoint publish device command status endpoint endpoint.
This allows the Device Partner to share the specific UID of the device that has opted out. The payload should include the UID along with a status of "OPT_OUT" and relevant timestamp.
For group commands, the group-level Device Partner endpoint command opt-out should be used, and not the individual device opt-out endpoint. The group command status should be updated to "OPT_OUT" to indicate a specific or set of specific devices in the group has opted out.
The Device Partner API needs to implement both individual and group opt-out flows:
- Individual devices: Report opt-out via the VPP endpoint publish device command status endpoint endpoint
- Group commands: Report that particular devices within a group have opted out via group-level Device Partner endpoint command opt-out
Properly reporting opt-out status at both the individual device and group level allows the VPP to update event logs and measurement & verification accordingly.
If a device is unenrolled from a VPP program via the Device Partner's app or portal, the device partner notifies the VPP via the publish device enrollment endpoint. The payload should include the device UID and a status of "unenrolled". The VPP will remove the device from the program and no longer collect data or call events on the device.
If a program manager unenrolls a device via the VPP platform, the VPP will call the Device Partner endpoint to unsubscribe from the device's data. The Device Partner should interpret the unsubscription as an unenrollment.
- Device shares all required data points for the device type
- Device shares power data in 5-minute increments or shares Energy Interval data
- Device successfully responds to group events, if applicable
- Device successfully responds to individual device events, if applicable
- Device successfully responds to cancelling an individual device event, if applicable
- Device successfully responds to cancelling a group event, if applicable
- Device signals for modes and command statuses align with test events before, during, and after the event window
- Device signals change in the correct direction relative to test event commands
- Device opts out of individual device event using publish device command status endpoint
- Device opts out of group event using command opt-out
Definitions for SIGNAL_KEY, SIGNAL_VALUE, SETTING_KEY, and VP_COMMAND_OBJECT all depend on the type of device (DEVICE_TYPE_ENUM) interfacing with the Gravity Connect API. This section will outline those values per device type.
NOTE: VP_COMMAND_OBJECT is only a portion of what is sent during an event. For the full payload, please see the Send Command endpoint.
Battery Command Payloads (VP_COMMAND_OBJECT)
Standby
{
    mode: 'STANDBY'
}
Charge
{
  mode: 'CHARGE',
  action: 'POWER',
  power: 4000
}
{
  mode: 'CHARGE',
  action: 'FASTEST'
}
Discharge
{
  mode: 'DISCHARGE',
  action: 'POWER',
  power: 4000
}
{
  mode: 'DISCHARGE',
  action: 'SITE_DEMAND',
  targetSiteDemand: 400
}
{
  mode: 'DISCHARGE',
  action: 'SITE_DEMAND',
  targetSiteDemand: 400,
  maxPower: 10000
}
Battery Signals
mode (String)
- Example Values
SELF_CONSUMPTIONBACKUPCHARGEDISCHARGESTANDBY
status (String)
- Internet connectivity of the device
- Valid Values
OFFLINEONLINE
grid-connection (String)
- Connectivity to the grid. Disconnections are typically temporary events that indicate power outages.
- Valid Values
CONNECTEDDISCONNECTED
max-capacity (Float)
- Maximum energy capacity for the device
- Unit: Wh
present-capacity (Float)
- Remaining energy capacity for the device
- Unit: Wh
max-usable-capacity (Float)
- Maximum usable energy capacity for the device
- Unit: Wh
present-usable-capacity (Float)
- Usable energy capacity remaining in the device
- Unit: Wh
discharge-power (Float)
- Present discharge power. Unsigned.
- Unit: W
charge-power (Float)
- Present charge power. Unsigned.
- Unit: W
max-discharge-power (Float)
- Maximum discharge power. Often fixed, but not always.
- Unit: W
max-charge-power (Float)
- Maximum charge power. Often fixed, but not always. Often equivalent to max-discharge-power, but not always.
- Unit: W
house-power (Float)
- Present load consumed by the site. Unsigned
- Unit: W
pv-power (Float)
- Present power being generated by PV panels attached to the system. Unsigned
- Unit: W
Battery Settings
min-reserve-percent-mfg (Float)
- The minimum state of charge, in %, that this device can reach during DR events. Only include a reserve value set by the homeowner if it is respected during DR events.
- Unit: Percentage
HWH Command Payloads (VP_COMMAND_OBJECT)
Shed
{
  mode: 'SHED'
}
Load Up
{
  mode: 'LOAD_UP'
}
Critical
{
  mode: 'CRITICAL'
}
Emergency
{
  mode: 'EMERGENCY'
}
Run Normal
{
  mode: 'RUN_NORMAL'
}
Advanced Load Up (Optional)
Where energy is an integer for Wh and suggestedEfficiencyLevel is an integer between 1 (representing low efficiency/fast heat up) and 9 (for high efficiency/slow heat up), or 10 for vacation mode.
{
  mode: 'ADVANCED_LOAD_UP',
  energy: 1000
  suggestedEfficiencyLevel: 1
}
Efficiency (Optional)
Where suggestedEfficiencyLevel is an integer between 1 (representing low efficiency/fast heat up) and 9 (for high efficiency/slow heat up), or 10 for vacation mode.
{
  mode: 'EFFICIENCY',
  suggestedEfficiencyLevel: 1
}
Duty Cycle (Optional)
Percentage ranges from 0-100
{
  mode: 'DUTY_CYCLE',
  percentage: 60
}
HWH Signals
mode (String)
- If additional modes are available, please let us know so we can consider standardized naming
- Example Values
NORMALSHEDCRITICALEMERGENCYLOAD_UPADVANCED_LOAD_UPERRORCYCLINGPRICE_STREAMVARIABLE
- Non-CTA devices are TBD
status (String)
- Internet connectivity of the device
- Valid Values
OFFLINEONLINE
tank-temperature (Float)
- In the case that both top and bottom temperature are reported, this would be the top temperature.
- Unit: Degrees Fahrenheit
- Not relevant for CTA devices
tank-bottom-temperature (Float)
- Optional, not all water heaters report temperature at the top and bottom of the tank
- Unit: Degrees Fahrenheit
- Not relevant for CTA devices
setpoint-temperature (Float)
- Unit: Degrees Fahrenheit
present-capacity (Float)
- For CTA2045, given the absence of tank-temperature / setpoint-temperature data
- Unit: Wh
max-capacity (Float)
- For CTA2045, given the absence of tank-temperature / setpoint-temperature data
- Unit: Wh
power (Float)
- Unit: W
- Not relevant for CTA devices
current (Float)
- Optional, may not be available
- Unit: A
- Not relevant for CTA devices
voltage (Float)
- Optional, may not be available
- Unit: V
- Not relevant for CTA devices
cta-op-state (String)
- Optional setting used by CTA
- Valid Values
IDLE_NORMALRUNNING_NORMALRUNNING_CURTAILEDRUNNING_HEIGHTENEDIDLE_CURTAILEDSGD_ERROR_CONDITIONIDLE_HEIGHTENEDCYCLING_ONCYCLING_OFFVARIABLE_FOLLOWINGVARIABLE_NOT_FOLLOWINGIDLE_OPTED_OUTIDLE_PRICE_STREAMRUNNING_OPTED_OUTRUNNING_PRICE_STREAMIDLE_PRICE_STREAM
cta-advanced-present-capacity (Float)
- Required if CTA advanced load up is supported
- Unit: Wh
cta-advanced-max-capacity (Float)
- Required if CTA advanced load up is supported
- Unit: Wh
HWH Settings
max-setpoint (Float)
- Defines the maximum setpoint that is allowed by the unit
- Unit: Degrees Fahrenheit
min-setpoint (Float)
- Defines the minimum setpoint that is allowed by the unit
- Unit: Degrees Fahrenheit
cta-advanced-loadup-enabled (Boolean)
- Optional setting used by CTA
cta-user-preference-level (Integer)
- Optional setting used by CTA. Expected values 0-10
Temperature Units
As described in the following specification, all temperatures are sent and received in units of Fahrenheit for consistency. However, these temperatures can be displayed in Celsius to users in appropriate locales.
TSTAT Command Payloads (VP_COMMAND_OBJECT)
Adjust Set Point
{
  mode: 'HEAT',
  temperature: -2.0
}
- This command accepts relative values only.
- The setpoint command is always processed as relative to the homeowner’s setpoint. For example, if the homeowner’s setpoint is currently 75, and the VPP receives a command for -3 followed by a command for -2, the second command sets the setpoint to 73, not to 70.
- Mode
- Valid values
- HEAT
- COOL
- Note that while other values can be sent as Signals, only these values will be sent in commands.
- Valid values
- Temperature
- Unit: degrees Fahrenheit
- Sign: For all modes, positive is an increase in temperature and negative is a decrease in temperature
TSTAT Signals
mode (String)
- Current mode of the device. Please use the following exact values for heating, cooling, automatic, and fan modes. This signal also accepts other modes supported by the device that are not listed here, such as 'DRY'.
- Valid Values
HEATCOOLAUTOFAN_ONLY
status (String)
- Internet connectivity of the device
- Valid Values
OFFLINEONLINE
state (String)
- Whether the device is on or off
- Valid Values
ONOFF
humidity (Float)
- Optional. Ambient humidity of the room, measured by the device. Range from 0 to 100
- Unit: Percentage
temperature (Float)
- Ambient humidity of the room, measured by the device
- Unit: Degrees Fahrenheit
cool-setpoint-temperature (Float)
- Optional; recommended if supported
- Unit: Degrees Fahrenheit
heat-setpoint-temperature (Float)
- Optional; recommended if supported
- Unit: Degrees Fahrenheit
louver-swing (String)
- Optional. Mode or speed of louver swing
- Example Values
AUTOFASTSLOWOFFON
fan-mode (String)
- Optional. Mode or speed of fan
- Example Values
HIGHMEDIUMLOWOFFON
equipment-status (String)
- Optional. Describes which parts of the equipment are currently running (typically more specific than 'mode'
- Example Values
FAN ONLYHEATINGHEATING STAGE 2NONE
runtime-fan (Float)
- The number of seconds of runtime in the interval of time starting at the specified timestamp. Cadence: 5 minutes, clock-aligned
- Unit: seconds
runtime-heat (Float)
- The number of seconds of runtime in the interval of time starting at the specified timestamp. Cadence: 5 minutes, clock-aligned
- Unit: seconds
runtime-cool (Float)
- The number of seconds of runtime in the interval of time starting at the specified timestamp. Cadence: 5 minutes, clock-aligned
- Unit: seconds
power (Float)
- Optional, the instantaneous power consumed by this device at the specified timestamp. Cadence: >= 5 minutes (not required to be clock aligned)
- Unit: kW
TSTAT Settings
max-setpoint (Float)
- Defines the maximum setpoint that is allowed by the unit
- Unit: Degrees Fahrenheit
min-setpoint (Float)
- Defines the minimum setpoint that is allowed by the unit
- Unit: Degrees Fahrenheit
EVSE Command Payloads (VP_COMMAND_OBJECT)
Standby
This puts the EV Charger in an idle state.
{
  mode: 'STANDBY'
}
Dispatch - Limit Power
Limit the charging power to the set power limit, in units or Watts.
{
  mode: 'DISPATCH',
  action: 'LIMIT_POWER',
  power: 1000
}
Dispatch - Percent Shed
{
  mode: 'DISPATCH',
  action: 'PERCENT',
  limitPercent: 100
}
EVSE Signals
status (String)
- Internet connectivity of the device
- Valid Values
OFFLINEONLINE
mode (String)
- The current operating state of the EVSE.
- Valid Values
INUSEAVAILABLENEEDS_SERVICE
power (Float)
- Current power consumption in Watts.
- Unit: W
- Example Values
04500
power-limit (Float)
- The current power limit applied at the EVSE.
- Unit: W
- Example Values
04500
EVSE Settings
max-power (Float)
- The maximum charging power that the EVSE supports.
- Unit: W
- Example Values
04500
V2G Command Payloads (VP_COMMAND_OBJECT)
Charge
{
  mode: 'CHARGE',
  action: 'POWER',
  power: 4000
}
{
  mode: 'CHARGE',
  action: 'FASTEST'
}
Discharge
{
  mode: 'DISCHARGE',
  action: 'POWER',
  power: 4000
}
{
  mode: 'DISCHARGE',
  action: 'SITE_DEMAND',
  targetSiteDemand: 400
}
{
  mode: 'DISCHARGE',
  action: 'SITE_DEMAND',
  targetSiteDemand: 400,
  maxPower: 10000
}
V2G Signals/Settings
V2G Signals
mode (String)
- Example Values
SELF_CONSUMPTIONBACKUPCHARGEDISCHARGESTANDBY
status (String)
- Internet connectivity of the device
- Valid Values
OFFLINEONLINE
max-capacity (Float)
- Maximum energy capacity for the device
- Unit: Wh
present-capacity (Float)
- Remaining energy capacity for the device
- Unit: Wh
max-usable-capacity (Float)
- Maximum usable energy capacity for the device
- Unit: Wh
present-usable-capacity (Float)
- Usable energy capacity remaining in the device
- Unit: Wh
discharge-power (Float)
- Present discharge power. Unsigned.
- Unit: W
charge-power (Float)
- Present charge power. Unsigned.
- Unit: W
max-discharge-power (Float)
- Maximum discharge power. Often fixed, but not always.
- Unit: W
max-charge-power (Float)
- Maximum charge power. Often fixed, but not always. Often equivalent to max-discharge-power, but not always.
- Unit: W
house-power (Float)
- Present load consumed by the site. Unsigned
- Unit: W
pv-power (Float)
- Present power being generated by PV panels attached to the system. Unsigned
- Unit: W
state (String)
- State of use of the device (most commonly used for EV chargers)
- Example Values
UNREACHABLEAVAILABLEINUSE
power-limit (Float)
- Max power presently allowed to charger; this is where we would expect to see a DR curtailment take effect
- Unit: W
V2G Settings
Most of the device partner's endpoints will utilize the device_partner_api_auth authentications. The only exception is the OAuth Device Discovery endpoint which uses device_partner_user_auth.
For information on how to authenticate when publishing data to the VPP, please see the Authentication section for those endpoints.
The Energy Interval endpoint collects energy interval data from devices, except low-voltage thermostats that do not record power data. Unlike other device telemetry, which is published to the VPP, energy intervals are polled by the VPP.
This data is more accurate than energy data that a VPP platform can compute from power data.
Providers typically use this data for:
- Performance reporting
- Historical analysis
- Resource planning
- Incentive program disbursement
startandenduse the same format as specified elsewhere for Gravity connect (as they are in the sample URL above)startis inclusive,endis exclusive- The response should include all intervals that overlap with this window
duration= duration of each interval, in seconds- Support for 900 second (15 minute) intervals is required
- Support for other typical intervals (e.g., 300, 3600) is optional
timerepresents the start of the interval, such thevalueshould represent the energy consumed betweentimeandtime + durationvaluehas units of watt-hours (Wh) and is signed:- For charge values, positive (>0)
- For discharge values, negative (<0)
- Intervals must be "clock-aligned" to 15-minute windows, eg 00:00:00, 00:15:00, 00:30:00, etc. See the examples below.
- Data must be available consecutively, and it must only become available after any previous gaps have been filled in where appropriate. The VPP interprets gaps in the data as zero energy, which is appropriate for devices that are frequently "off", such as EV chargers and thermostats.
- Otherwise, the VPP could not distinguish a temporary delay from a true lack of device activity.
- For EV chargers and other devices that are "off", values of zero (0) should be present if they are part of a charging session, but do not need to be present for intervals outside of sessions (the VPP will infer the absence of data as non-charging time once the next explicit interval appears chronologically).
- Zero (0) can also be used when the energy data is unavailable and not expected to become available later.
- The VPP will typically poll this endpoint once per day per device, with a start time of the last recorded interval for the device. This picks up data that was delayed temporarily due to issues such as device connectivity.
Examples
- The VPP requests: start time: 13:05. end time: 13:15
- The response should include all energy consumption between 13:00 and 13:15, not just the energy consumed in the specified 10 minutes.
- The VPP requests: start time: 12:00, end time: 15:13
- The response should include data points for all complete 15-minute intervals, which is the intervals from 12:00 to 15:00. The data between 15:00 and 15:13 will be retrieved in the next query after the 15:00-15:15 interval is available.
How far in advance can commands be scheduled? How long can commands last?
Commands are sent in the 60 seconds before the start time and will not exceed a 24 hour duration. Commands with a start time in the past should still be considered valid so long as the current time is within the duration.
What is the difference between device registration, subscription, and enrollment?
An "enrolled" device has been approved to participate in a VPP program. Subscription refers to whether the VPP is choosing to receive data for that device. When modifying the subscription of a device, the VPP can choose to register or unregister the device.
How does the device partner know which PROGRAM_PUBLISH_KEY and PROGRAM_PUBLISH_SECRET to use when publishing data?
The VPP will provide a unique PROGRAM_PUBLISH_KEY and PROGRAM_PUBLISH_SECRET for new programs. The Device Partner should associate new devices with the program so that it can use the correct program credentials.
How frequently should device data be published to the VPP?
Telemetry data in the lists of "signals" and "settings" should be published between every 5 and every 15 minutes. This data should contain 5 minute intervals for continuous signals. Categorical signals and settings that change infrequently can be updated only on change.
My device publishes data that doesn't correspond to an existing signal or setting. What should I do with it?
The signal and setting lists are constantly evolving. Please contact the Gravity Connect team with suggestions for updating the specification.
How should a Device Partner handle errors when publishing data to the VPP's endpoints?
Please see the Error Handling section in the VPP API documentation.
What's the difference between the command status and the device command status?
Device command status is for a specific device. Command status is used for groups of devices.
For individual device commands, use only the device command status endpoint.
For group commands, the command status reflects the state of the command at a scheduling engine level. For example, OPT_OUT would not apply and a status of FAILED means there was an issue scheduling the command as a whole. If a particular device's status does not reflect the greater command status (e.g., an individual device fails or opts out), report that difference via the device command status. Device command status that is the same as the current command status does not need to be reported.
Does /subscription control Command Status and Device Command Status publishing to the VPP?
No, this endpoint only controls the sending of signals and settings. In the case that an unsubscribed device is targeted by a command (which is not an expected situation), the response data should not be reported to the VPP.
Read device details
Authorizations:
path Parameters
| DEVICE_UID required | string The unique identifier for the target device within the partner's platform |
Responses
Response samples
- 200
- 400
- 401
- default
{- "uid": "string",
- "kind": "HWH",
- "name": "string",
- "type": "string",
- "serialNumber": "string",
- "isSubscribed": true,
- "isInstalled": true
}Update signal/setting
There may be cases where a particular signal or setting can be modified by Virtual Peaker. If this is supported, this endpoint is to be used.
Authorizations:
path Parameters
| DEVICE_UID required | string The unique identifier for the target device within the partner's platform |
| SIGNAL_OR_SETTING required | string Enum: "signal" "setting" Whether the data type is a signal or a setting |
| DATA_KEY required | string The signal/setting type being read, varies based on device type, see documentation |
Request Body schema: application/jsonrequired
| key required | string |
required | string or number |
| time required | string <date-time> For more see, RFC 3339, section 5.6. As an example, '2017-07-21T17:32:28Z'. The timezone is always zero UTC offset. |
Responses
Request samples
- Payload
{- "key": "string",
- "value": "string",
- "time": "2019-08-24T14:15:22Z"
}Response samples
- 400
- 401
- default
{- "message": "string"
}Read signal/setting
Authorizations:
path Parameters
| DEVICE_UID required | string The unique identifier for the target device within the partner's platform |
| SIGNAL_OR_SETTING required | string Enum: "signal" "setting" Whether the data type is a signal or a setting |
| DATA_KEY required | string The signal/setting type being read, varies based on device type, see documentation |
Responses
Response samples
- 200
- 400
- 401
- 404
- default
{- "key": "string",
- "value": "string",
- "time": "2019-08-24T14:15:22Z"
}Read list of devices
Authorizations:
query Parameters
| page required | integer The page number to retrieve (pages start at 0) |
| pageSize | integer Default: 1000 The number of devices to return per page |
Responses
Response samples
- 200
- 400
- 401
- default
{- "page": 0,
- "pageSize": 0,
- "count": 0,
- "devices": [
- {
- "uid": "string",
- "kind": "HWH",
- "name": "string",
- "type": "string",
- "serialNumber": "string",
- "isSubscribed": true,
- "isInstalled": true
}
]
}Manage device publishing
This endpoint is used to enable or disable the publishing of device data (signals and settings) to Virtual Peaker.
Authorizations:
Request Body schema: application/jsonrequired
| state required | string Enum: "register" "unregister" |
| uid required | string The unique identifier for the target device within the partner's platform |
| secret | string DEVICE_PUBLISH_SECRET; Passed when a device is subscribed to data, used to create an HMAC when the Device Partner publishes device data to Virtual Peaker |
Responses
Request samples
- Payload
{- "state": "register",
- "uid": "some-device-uid",
- "secret": "some-device-secret"
}Response samples
- 400
- 401
- default
{- "message": "string"
}Send command
Authorizations:
Request Body schema: application/jsonrequired
| targeting required | string Enum: "group" "device" |
| uid required | string Group or device uid |
| kind | string (DeviceKindEnum) Enum: "HWH" "TSTAT" "BATTERY" "EVSE" "V2G" "STORAGE-HVAC" |
| startTime required | string <date-time> For more see, RFC 3339, section 5.6. As an example, '2017-07-21T17:32:28Z'. The timezone is always zero UTC offset. A startTime in the past should still be considered valid if startTime + duration is still in the future |
| duration required | integer Length of event in seconds. The value should be greater than 0. If a device partner imposes a maximum event duration, frequently it is either 8 or 24 hours. |
| command | object Varies by device kind, see documentation for VP_COMMAND_OBJECT |
Responses
Request samples
- Payload
{- "targeting": "group",
- "uid": "string",
- "kind": "HWH",
- "startTime": "2019-08-24T14:15:22Z",
- "duration": 0,
- "command": { }
}Response samples
- 200
- 400
- 401
- default
{- "refId": "string"
}Read command state
Authorizations:
path Parameters
| COMMAND_REFERENCE_ID required | string The id of the command being read |
Responses
Response samples
- 200
- 400
- 401
- default
{- "state": "PENDING",
- "description": "string",
- "time": "2019-08-24T14:15:22Z",
- "refId": "string"
}Cancel command
Authorizations:
path Parameters
| COMMAND_REFERENCE_ID required | string The id of the command being cancelled |
Responses
Response samples
- 200
- 400
- 401
- default
{- "state": "PENDING",
- "description": "string",
- "time": "2019-08-24T14:15:22Z",
- "refId": "string"
}Energy interval data from non-tstat device
Authorizations:
path Parameters
| DEVICE_UID required | string The unique identifier for the target device within the partner's platform |
query Parameters
| start required | string <date-time> For more see, RFC 3339, section 5.6. As an example, '2017-07-21T17:32:28Z'. The timezone is always zero UTC offset. A startTime in the past should still be considered valid if startTime + duration is still in the future |
| duration required | integer Length of event in seconds. The value should be greater than 0. If a device partner imposes a maximum event duration, frequently it is either 8 or 24 hours. |
Responses
Response samples
- 200
- 400
- 401
- default
[- {
- "value": 0,
- "time": "2019-08-24T14:15:22Z",
- "duration": 0
}
]The OAuth device discovery flow works as follows:
- The device owner fills out an onboarding form on Virtual Peaker's site.
- At the end of the form, we redirect them to the Device Partner's OAuth authorization page via a link.
- The user logs into the Device Partner's app and grants OAuth access permissions.
- The Device Partner app completes OAuth authorization code flow, exchanging the code for an access token.
- Using the access token, the Device Partner calls their API to retrieve the user's devices.
- The Device Partner associates the devices with the correct Virtual Peaker program in their backend.
- The Device Partner handles any additional onboarding logic in their system.
- The Device Partner publishes enrolled device data to Virtual Peaker's API.
- Virtual Peaker discovers devices using the OAuth token provided.
- We subscribe to devices for data publishing and provide a DEVICE_PUBLISH_SECRET.
- Virtual Peaker may optionally pull initial device data from the Device Partner's API. For each utility program, a separate client_id is created.
This ID is passed in the OAuth link to associate devices with the correct program.
Response samples
- 200
- 400
- 401
- default
{- "userId": "string",
- "accountNumber": "string",
- "name": "string",
- "email": "string",
- "deviceUids": [
- "string"
], - "serviceAddress": {
- "streetAddress": "string",
- "streetAddress2": "string",
- "city": "string",
- "state": "string",
- "postalCode": "string",
- "country": "string"
}
}The pairing code device discovery flow works as follows:
- The device owner fills out an onboarding form on Virtual Peaker's site.
- At the end of the form, we provide them with a pairing code and instructions to enter it in the Device Partner's app.
- Optionally, the user selects which devices to enroll via the Device Partner's interface. Otherwise, all devices are enrolled by default.
- When the user enters the pairing code in the Device Partner's app, the Device Partner publishes a device enrollment event to Virtual Peaker's API.
- The publish event includes the pairing code, allowing Virtual Peaker to link the device back to the onboarding form entry.
- If multiple devices are enrolled, the same pairing code is used in each publish payload.
- Virtual Peaker discovers the user details associated with the enrolled device(s).
- We subscribe to the devices for data publishing and provide a
DEVICE_PUBLISH_SECRET.
The user experience is driven through the Device Partner's web or mobile app after receiving the pairing code. This links together the Virtual Peaker and Device Partner platforms.
Describe device's user
If a new device is added to Virtual Peaker via the Virtual Peaker's publish device enrollment endpoint. Virtual Peaker will use this endpoint to discover the user associated with the device.
Authorizations:
path Parameters
| DEVICE_UID required | string The unique identifier for the target device within the partner's platform |
Responses
Response samples
- 200
- 400
- 401
- default
{- "userId": "string",
- "accountNumber": "string",
- "name": "string",
- "email": "string",
- "deviceUids": [
- "string"
], - "serviceAddress": {
- "streetAddress": "string",
- "streetAddress2": "string",
- "city": "string",
- "state": "string",
- "postalCode": "string",
- "country": "string"
}
}The utility commissioned pairing code flow could work as follows:
- The device owner fills out an onboarding form on Virtual Peaker's site.
- The utility reviews the submission and approves it if eligible.
- Virtual Peaker informs the Device Partner of the install address and provides a pairing code.
- The Device Partner takes necessary actions to install and activate the device on-site.
- When installation is complete, the Device Partner publishes a device enrollment event to Virtual Peaker.
- The publish includes the pairing code to link with the onboarding form.
- If multiple devices are installed, the same code is used in each payload.
- Virtual Peaker discovers user details for the enrolled device(s).
- We subscribe to the device(s) for data publishing and provide a
DEVICE_PUBLISH_SECRET.
In this flow, the utility directs the installation. The pairing code links the user signup, Device Partner platform, and Virtual Peaker after install. The flow described above can have slight variations depending on the use case.
Describe device's user
If a new device is added to Virtual Peaker via the Virtual Peaker's publish device enrollment endpoint. Virtual Peaker will use this endpoint to discover the user associated with the device.
Authorizations:
path Parameters
| DEVICE_UID required | string The unique identifier for the target device within the partner's platform |
Responses
Response samples
- 200
- 400
- 401
- default
{- "userId": "string",
- "accountNumber": "string",
- "name": "string",
- "email": "string",
- "deviceUids": [
- "string"
], - "serviceAddress": {
- "streetAddress": "string",
- "streetAddress2": "string",
- "city": "string",
- "state": "string",
- "postalCode": "string",
- "country": "string"
}
}Publish houses for installation
In the use case where the device partner needs a list of houses to physically install devices, Virtual Peaker will publish the list of houses and corresponding pairing codes via this endpoint. Virtual Peaker will publish to this endpoint nightly with a list of all houses/devices to be installed (the same house will be published each night until it is installed). When the device is installed, the device partner will then use the publish device enrollment status.
Authorizations:
Request Body schema: application/jsonrequired
Array of objects Included if the device partner needs more details on which device (and how many) need installed. If not included, it's assumed the device partner can infer this information based on the program. | |
| pairingCode required | string The current format is:
|
required | object (ServiceAddress) |
Responses
Request samples
- Payload
[- {
- "devices": [
- {
- "kind": "HWH",
- "type": "string"
}
], - "pairingCode": "A1012344",
- "serviceAddress": {
- "streetAddress": "string",
- "streetAddress2": "string",
- "city": "string",
- "state": "string",
- "postalCode": "string",
- "country": "string"
}
}
]Response samples
- 200
- 400
- 401
- default
{- "message": "string"
}Virtual Peaker supports managing groups of devices, in addition to individual device control. Grouping enables utilities to target clusters of devices together in demand response events.While device telemetry and configuration data is still reported on a per-device level, groups allow a single command to be broadcast to multiple enrolled devices simultaneously. To utilize grouping, the Device Partner integration must support both individual and group commands concurrently. The same device could receive an individual command, while also belonging to a group receiving a separate directive. Group commands have additional considerations:
- Devices can opt out of group events individually, while the overall group command remains active.
- Group command statuses reflect execution at the scheduling engine level rather than device state.
- The Device Partner must reconcile group vs. individual state to ensure consistency in reporting.
When not specified, all other workflows behave identically between individual and grouped devices - enrollment, data publishing, cancellations, etc.
Create group
Authorizations:
Request Body schema: application/jsonrequired
| deviceUids | Array of strings Array of device uids for the Device Partner to assign to the newly created group. Can be an empty array |
| name | string Human readable name of group |
Responses
Request samples
- Payload
{- "deviceUids": [
- "string"
], - "name": "string"
}Response samples
- 200
- 400
- 401
- default
{- "uid": "string",
- "invalidDevices": [
- "string"
]
}Update group details
Update group details, if deviceUids is passed, it will overwrite the current list of devices.
Authorizations:
path Parameters
| GROUP_ID required | string The id of the device being targeted |
Request Body schema: application/jsonrequired
| deviceUids | Array of strings Updated array of deviceUids which will overwrite the existing array (as opposed to adding and removing a list of deviceUids) |
| name | string Human readable name of group |
Responses
Request samples
- Payload
{- "deviceUids": [
- "string"
], - "name": "string"
}Response samples
- 200
- 400
- 401
- default
{- "uid": "string",
- "deviceUids": [
- "string"
], - "name": "string",
- "invalidDevices": [
- "string"
]
}Delete group
Deletes a group and returns the list of devices that were within the group when deleted
Authorizations:
path Parameters
| GROUP_ID required | string The id of the device being targeted |
Responses
Response samples
- 200
- 400
- 401
- default
{- "uid": "string",
- "deviceUids": [
- "string"
], - "name": "string"
}Manage group devices
Authorizations:
path Parameters
| GROUP_ID required | string The id of the device being targeted |
Request Body schema: application/jsonrequired
| deviceUids required | Array of strings Array of device uids for the Device Partner to assign to or remove from the group |
| action required | string Enum: "add" "remove" |
Responses
Request samples
- Payload
{- "deviceUids": [
- "string"
], - "action": "add"
}Response samples
- 200
- 400
- 401
- default
{- "uid": "string",
- "deviceUids": [
- "string"
], - "name": "string",
- "invalidDevices": [
- "string"
]
}Command Opt-Out
To communicate that particular devices within a group have opted out. For non-group command this is achieved via canceling the entire command.
Authorizations:
path Parameters
| COMMAND_REFERENCE_ID required | string The id of the command |
Request Body schema: application/jsonrequired
| deviceUids required | Array of strings Array of device uids for the Device Partner to opt out of the command |
Responses
Request samples
- Payload
{- "deviceUids": [
- "string"
]
}Response samples
- 200
- 400
- 401
- default
{- "message": "string"
}